Due Wed, 09/02 at 11:59pm
Introduction
Today we will be configuring your lab repo using git and GitHub. Next week we will be working on collaboration workflows.
Here are the Lab 2 slides.
Programming Readiness Tip If you feel like you need more Java or Python programming practice, please see the programming review section.
1. Add your GitHub username to the spreadsheet
If you haven’t already, please register for a GitHub account, and then add your full name and your GitHub username to this spreadsheet. I will invite you to be a contributor to the relevant repos.
- Note that you will have to confirm this invitation via email.
- I recommend that you use your UNCA email account because you can get some student perks later from GitHub.
Before moving on
2. Set up public / private key authentication for GitHub
When accessing a remote server (including a GitHub server), a common authentication strategy involves using public and private keys. Below, you will go through the process of generating a public / private key. Your private key is for you and you alone. It is your secret, and should not be shared with anyone. Your public key, on the other hand, is typically copied to a server to which you have access.
In the workflow outlined below, all commands should be run from the command line on your local computer (not arden). If you’re a Windows user, activate WSL.
2.1. Generate a public / private key pair
To generate a public / private key pair (use WSL if you’re a Windows user):
- Type the following command (from any directory on your terminal):
ssh-keygen - This will generate your private key inside the
.sshfolder inside your home directory (accept the default name or rename – up to you). Typically, the private key is calledid_rsaand the public key is calledid_rsa.pub. - Verify that this worked by typing
ls -la ~/.ssh. You should see both files (with today’s timestamp).
2.2. Copy your public key to GitHub
- Follow the GitHub instructions
- More on public / private keys here: https://kb.iu.edu/d/aews
Before moving on
ls -la ~/.ssh shows id_rsa and id_rsa.pub (or equivalent key files)3. Fork the Course Repository
In this class, we’re going to be working with various shared repositories on GitHub. For most of our labs and in-class exercises, we will be using the class-exercises-fall2026 repository. You will “fork” your own personal copy of this repository on Github that you will periodically sync with the class repo. This will be for doing individual work and activities.
Before we get into the details of various GitHub workflows, you will create a copy of the course repo – one that you own – on GitHub. To do this:
- Navigate to the course repository: https://github.com/csci338/class-exercises-fall2026
- Click the “Fork” button (towards the top of the page on the right hand side)
- Confirm where you would like the repo to be forked (choose your GitHub account).
Before moving on
https://github.com/<my-username>/class-exercises-fall2026 in the browser4. Set up the course repo on your local computer
Now, on your laptop, make a copy of your repo locally (using the SSH protocol):
-
Navigate to your
csci338directory on the command line. -
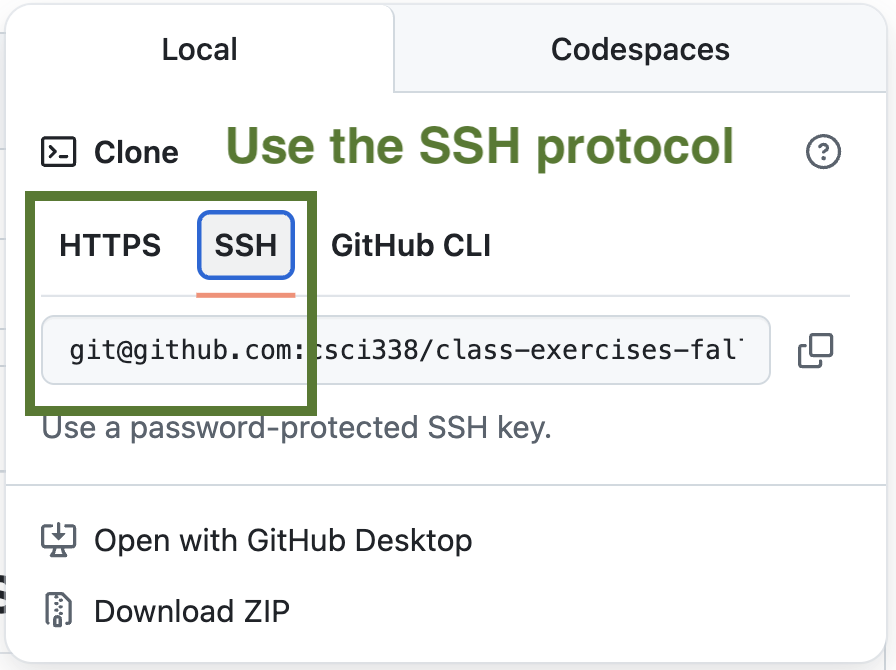
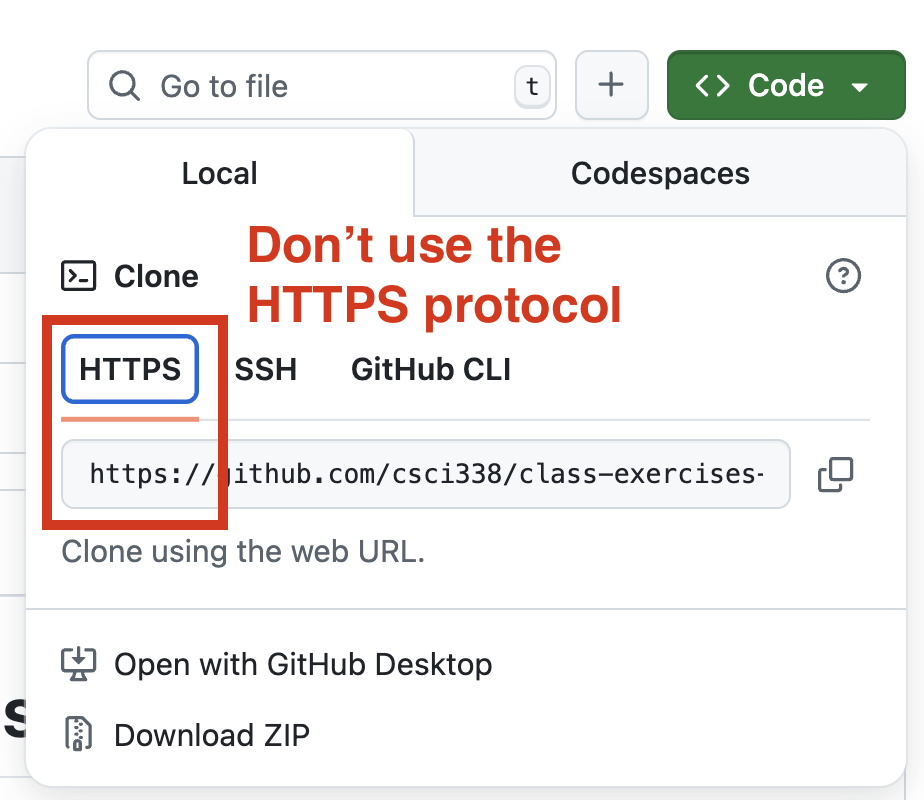
On GitHub, click the green “Code” button of the course repo that you just forked. Make sure that you copy the SSH version of the address:
-
Within your
csci338directory, clone theclass-exercises-fall2026repo using the ssh method using the following command:git clone ADDRESS_YOU_JUST_COPIEDThe address should look something like this:
git@github.com:walter/class-exercises-fall2026.git -
Navigate into the
class-exercises-fall2026folder (that was just created) -
Look at commit history (
git log)
Before moving on
pwd shows I am inside class-exercises-fall2026git log shows commit history (no authentication errors)5. Make a new branch
- Create a new branch called
lab02-b- See the git cheatsheat
- Switch to the branch you just made (if you haven’t already)
- Verify that you are now on the
lab02-bbranch (see cheatsheet)
Before moving on
git branch (or git status) shows I am on lab02-b6. Write some code (Java Practice)
- Open the entire
class-exercises-fall2026folder in VS Code. - Create a folder named
lab02 - Inside of your
lab02folder, create a text file calledContainsPair.java - Within the
ContainsPair.javafile, implement both a nested-loop solution and a set-based solution to determine whether a list contains a repeated value. Here’s a stub to help you:
import java.util.Arrays;
import java.util.HashSet;
import java.util.List;
import java.util.Set;

public class ContainsPair {

    public static void main(String[] args) {
        checkCase(Arrays.asList(), false, "empty");
        checkCase(Arrays.asList(3), false, "singleton");
        checkCase(Arrays.asList(1, 2, 3, 2), true, "duplicate");
        checkCase(Arrays.asList(5, 2, -10, 44, 90), false, "no duplicate");
        checkCase(Arrays.asList(-2, 4, -2), true, "negative duplicate");
        checkCase(Arrays.asList(7, 7, 7), true, "repeated more than twice");
    }

    public static boolean checkNestedLoops(List<Integer> values) {
        // TODO: compare values using nested loops
        return false;
    }

    public static boolean checkWithSet(List<Integer> values) {
        // TODO: use a Set to remember values already seen
        return false;
    }

    private static void checkCase(List<Integer> values, boolean expected, String label) {
        boolean nestedResult = checkNestedLoops(values);
        boolean setResult = checkWithSet(values);
        if (nestedResult == expected && setResult == expected) {
            System.out.println("PASS: " + label);
        } else {
            System.out.println(
                "FAIL: " + label + " expected " + expected
                + " but got nested=" + nestedResult + ", set=" + setResult
            );
        }
    }
}- Compile it on the command line using the
javaccommand (e.g.,javac ContainsPair.java). See the Lecture 3 slides for potential solutions. Make sure you’re in the right directory. This should generate the compiledContainsPair.classfile.- If you’re on WSL and
javacis not installed, you can install it using the apt package manager as follows:sudo apt install default-jdk
- If you’re on WSL and
- Run your program on the command line by typing
java ContainsPair
Before moving on
javac ContainsPair.java succeedsjava ContainsPair prints PASS for each test case7. Exclude all .class files
When working with version control, you don’t want to commit compiled code, system files, passwords, or third-party libraries. Luckily, the .gitignore file makes this easy.
From the command line
- Type
git status -u. What happened?- This command should tell you all of the untracked changes you’ve made.
- Edit the
.gitignorefile by adding this line:*.class - Type
git status -uagain. What happened?
If you did it correctly, git is now ignoring your *.class file.
Before moving on
.gitignore includes *.classgit status -u no longer lists ContainsPair.class8. Write some code in Python (Language-Transfer Practice)
First, check if python is installed:
Windows
If you’re using WSL, python is probably installed. Open a WSL terminal and type:
python --version or py --version or python3 --version.
If any of those commands returns a 3.x python version, then you’re good to go. Otherwise, you will need to install a new version: https://www.python.org/downloads/
Mac
If you’re on a Mac, check if a 3.x version of python is installed. Open a terminal and type:
python --version or python3 --version.
If these commands aren’t recognized, or if they show an older version of python, you will need to install a new version: https://www.python.org/downloads/
Write some code
-
Inside of your
lab02folder, create another text file calledcontains_pair.py -
Within the
contains_pair.pyfile, implement one of the “contains pair” solutions we discussed in class (ideally the fastest one). Here’s a stub to help you:def check(l: list): # your code goes here return False print(check([1, 2, 3, 2])) # should print True print(check([5, 2, -10, 44, 90])) # should print False
Run / test your program on the command line by typing python3 contains_pair.py.
On some systems, the python executable is invoked with a different alias (see below). So figure out which one you’ll need to use and make a note of it:
py contains_pair.pypython contains_pair.pypy3 contains_pair.py
New to Python? Begin from your working Java solution and compare the two languages. For this Practice section, you may ask ChatGPT to explain Python syntax or help translate your own Java code, but disclose that use in a comment. You remain responsible for tracing and explaining the Python result. This translation does not count as readiness Verification.
Before moving on
True then False9. Stage and commit your changes
- Stage your changes using
git add .(the dot indicates that you want to stage all of the files that have been added / deleted / edited). - Commit your changes using
git commit -m "Some descriptive commit message"(e.g. “Lab 2 is completed”).
Before moving on
git status shows a clean working tree (or only untracked files I intentionally left out)git log -1 shows my latest commit message10. Push (upload) your changes to GitHub
- Push your branch to GitHub using the
git pushcommand- This command should display an error with a suggested push command (e.g.,
git push --set-upstream origin <your-branch-name>). This is telling you that there is no branch calledlab02-bin the GitHub repository.
- This command should display an error with a suggested push command (e.g.,
- Try again by typing
git push --set-upstream origin lab02-b
A note on your origin path
Within git, your remote origin variable holds both the address and the protocol you will be using to interact with a remote server (like GitHub). Some of you are accessing the remote server using the https protocol while others are using the ssh protocol. For the sake of simplicity, let’s all use ssh. To check your origin, type: git remote show origin.
If it prints git@github.com:<your-user-name>/class-exercises-fall2026, you don’t have to do anything. Otherwise, let’s switch up your origin protocol to ssh as follows:
git remote rm origin  # removes current references
git remote add origin git@github.com:<your-user-name>/class-exercises-fall2026.git  # adds new reference
git remote show origin  # prints the new origin (which should be the correct one).
If you get a “Please tell me who you are.” error message, please set the following environment variables on your machine (you will only have to do this once):
git config --global user.name "My Name"
git config --global user.email "my_email@gmail.com"
Please use the email you used to register with GitHub
11. Make a Pull Request
Now that your code is on GitHub, you’re going to make a “Pull Request” so that I can review your code. Do this on your fork of class-exercises-fall2026 (not the instructor’s csci338 repo).
-
Open your fork on GitHub:
https://github.com/<your-username>/class-exercises-fall2026 -
Click Contribute → Open pull request (or the Compare & pull request banner if GitHub shows one).
-
Set the branch comparison like this:
base (left)                    compare (right)
┌─────────────────────┐        ┌───────────────────────┐
│ your-username/main  │   ←    │ your-username/lab02-b │
│   (your fork)       │        │   (your branch)       │
└─────────────────────┘        └───────────────────────┘
Both sides should show your GitHub username as the repository owner. If the left side says
csci338, switch it to your fork before creating the PR. -
Copy the URL of the pull request and keep the link handy for Canvas.
Before moving on
lab02-b branch is visible on GitHublab02-b into my main (not the instructor repo)What do I turn in?
Please paste a link to your pull request in the Canvas submission box. Also, please verify that…
- You created a branch called
lab02-b. - You have a working
ContainsPair.javafile in it. - You have edited your
.gitignorefile so thatContainsPair.classis not checked into version control. - You have a working
contains_pair.pyfile in it.